It’s common for homeowners to worry when they see a bubble forming on their flat roof. You probably chose a flat roof because you wanted the surface to look sleek and even, so an unsightly bubble is the last thing you want.
If you take nothing else away from this article, let it be this: don’t panic! A bubble on your roof is a problem, but it’s not the end of the world, and it can be fixed – particularly if you address it early.
In this article, you’ll learn what roof bubbles are, why they form on flat roofs and how you can fix them.
What is a roof bubble?
Your flat roof likely consists of multiple layers, with a membrane on top to keep out water.
During the installation of your roof, tiny pockets of air and moisture are left between the layers. Over time, various factors cause these pockets to expand and crack open, making pockets visible to the naked eye.
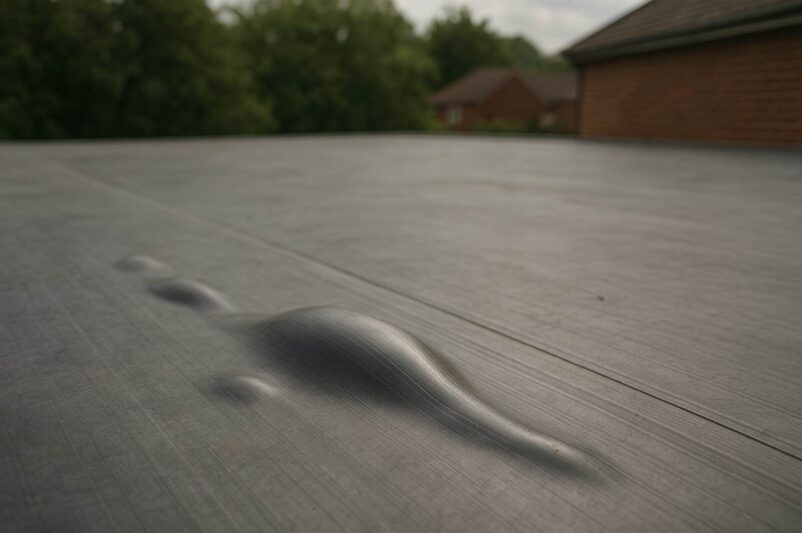
These visible pockets are known as roof bubbles. They’re sometimes referred to as “blisters” as well. Roof bubbles:
- Can occur on any type of flat roof, whether the roof is made from BUR, modified bitumen, EPDM, TPO or PVC. They’re most common on BUR roofs.
- Can vary in terms of size, shape and number. You might see one or two in the same area, but you could equally see tons of them all over the roof.
- Will not disappear over time. They might grow or shrink, but they’ll never vanish completely unless you fix them.
What causes roof bubbles?
There are lots of factors that contribute to the development of roof bubbles on a flat roof. Here are a few of them.
Air trapped during installation
The root cause of roof bubbles is pockets of air getting trapped between the layers on your roof during installation. Over time, these pockets can get exacerbated by the weather factors listed below, as well as basic wear and tear.
Air commonly gets trapped between roof layers when a roofer fails to remove dirt and debris before applying a new layer. The debris prevents the adhesive from fully contacting the roof decking, and it’s those areas with poor contact that trap air.
In a rush to get the job done quickly, a careless roofer might also apply roof layers too thinly, or unevenly. If they miss sections of the roof during the process of adding a layer, those sections will be prone to having air bubbles.
It’s also possible your roofer didn’t give your roof sufficient time to dry before adding the next layer, or the membrane on top. If the layer underneath the top layer wasn’t completely dry, it may have released solvent vapors, especially if the installation occurred on a sunny day. Those vapors show up as bubbles.
Or perhaps your roofer walked on the roof while the layers were still setting and inadvertently disturbed a section of roofing, breaking the bond between the adhesive and the deck and opening up space for air to get in.
Moisture infiltration
Once a pocket of air is formed, the main culprit for that turning into a roof bubble is moisture infiltration.
Moisture enters all roofs to some degree due to condensation, even more so if your roof has a leak somewhere. Be careful if you see water pooling on your roof, since it’s likely to seep into any small cracks or tears.
As moisture builds up over time, it creates pressure, causing the layers of your roof to separate from each other, forming bubbles.
Your roof layers are most likely to split apart in areas where there’s already an existing pocket of air that was introduced during installation. That being said, water pressure is also sufficient to cause roof bubbles in its own right.
Temperature changes
When it’s cold, the water inside a roof system sometimes freezes. As it turns to ice, it expands. If water was present in any bubbles, they will expand together with the water.
When the ice melts again, the roofing materials contract and return to how they were before the freezing took place.
Over time, this constant freezing and thawing causes roofing materials to lose their adhesion. Existing bubbles grow, and new ones are formed as the layers of roofing slowly detach from the decking.
When it’s hot in the summer, direct sunlight can also cause roofing materials to expand. Overnight, the roof cools down and contracts. As with the freeze-thaw cycle, these small movements of the roof layers lead to bubble formation over time.
Poor ventilation
Sometimes, the causes of roof bubbles are below the surface of the roof itself.
In buildings with insufficient ventilation, moisture from everyday activities like cooking and washing rises and accumulates beneath the roof deck. The moisture becomes trapped in the insulation, causing it to become saturated with water.
When temperatures rise, the trapped moisture evaporates. As it does, it expands, pushing upwards against the roof. This creates roof bubbles.
Deteriorating roof materials
No roof lasts forever, no matter how well built and no matter how high-quality the materials that were used.
Over time, exposure to the elements and UV light causes adhesives on flat roofs to break down. The reinforced layer of rocks and granules that’s present on top of a BUR roof delays this process, but can’t prevent it altogether.
The closer a roof is to the end of its service life, the likelier you are to see bubbles forming.
How to fix roof bubbles
The longer you have roof bubbles, and the more moisture they are exposed to, the more of a problem they become. They act as weak points in the roof structure, attracting leaks.
If the bubbles grow larger, you’re likely to experience water intrusion in your property, perhaps even structural problems. So it’s imperative to get them fixed as soon as you see them.
Here’s an 8-step process to fix your roof bubbles.
1. Identify the bubbles
Carefully inspect your roof and make a note of where all the visible bubbles are.
Pay particular attention to areas that have multiple bubbles, as these areas will be structurally weaker and need the most reinforcing.
2. Clean and dry
Before you start work, clean the affected areas. Remove any debris that could get stuck under the roof layers and cause new bubbles.
Thoroughly dry the roof to prevent any water from infiltrating the roof system while you open it up in the next steps.
3. Cut the bubbles
There are two ways to do this:
- Either pop the bubble by making a small X-shaped cut in its center
- Or cut out the bubble entirely, making sure to remove all the damaged parts
The first method is advisable for small, one-off bubbles. For larger ones, or areas with multiple bubbles, use the second method.
Whichever way you choose, cut as gently and shallowly as you can to avoid puncturing any layers below, or the roof decking itself. Ensure the membrane is as flat as possible so that you can place a new layer on top of it to repair the damage.
4. Drain moisture
If there’s any moisture inside the bubble, or inside the section you’ve cut out, allow it to drain out completely.
This step is often overlooked, but it’s essential to stop new bubbles from forming inside the section you’re repairing. `
5. Apply adhesive
Next, you’ll need to apply an adhesive so the new layer you add over the hole has something to stick to.
The most commonly used material here is roofing cement, since it’s waterproof and great for filling gaps on roofs. You can also use mastic.
Apply the adhesive to the damaged area. If you’re using cement, it should be roughly ⅛ inch thick. Make sure that you cover any edges thoroughly, and spread it up to 6 inches beyond the affected area to ensure a consistent seal.
Once you’re done, you should be left with a smooth, level surface. You shouldn’t be able to see any holes anymore.
6. Patch the hole
Cut a piece of fiberglass mesh that matches your existing roofing materials, ensuring it’s slightly larger than the hole you’re patching.
Place the mesh over the hole, making sure to push it down firmly into the adhesive. Be careful to keep the mesh flat and even as you do this, to avoid creating any new bubbles.
To ensure that you create a level surface, ensure that you overlap the hole you’re patching by several inches.
7. Seal the hole
Spread a layer of roofing cement or another sealant over the fiberglass mesh to seal it. The sealant should be about ½ inch thick, enough to hide the mesh from view.
Pay particular attention to the edges of the mesh, as these are the points that will be most prone to bubbles in the future. The last thing you want is for moisture to infiltrate underneath the mesh you just installed.
Smooth the sealant with a trowel, then use a roller to press it down, ensuring it’s level and adheres to the mesh correctly.
8. Finish with gravel
Finally, add a layer of gravel on top of the hole to protect it from UV rays. Do this before the cement dries so that the gravel embeds into the roof.
Your aim here should be to make sure the gravel is spread evenly, to the point that every part of the hole is covered. You shouldn’t be able to see the cement or the mesh below.
As an alternative, you could also use a can of reflective coating and brush it into the roof.
Wrapping up
It’s possible for homeowners to fix their own roof bubbles, but you can see from the above process that it’s quite challenging for those without substantial DIY experience.
If your roof bubbles are widespread or severe, we recommend that you get professional support. You’ll save the money that you invest later down the line when you have a roof that’s less prone to bubbles and leaks.
At Presidio, we’re happy to inspect your roof bubbles free of charge. We’ll recommend a course of action, and let you know if we can help.
Call (210) 660-3682 to schedule your free roof inspection today!

About the Author
Certifications & Affiliations